Context menu start windows 10. Making changes manually
Updates in Windows 10 constantly cause inconvenience to users, forcing them to spend time searching for the causes of problems and fixing them. Many, having restarted the computer after installing the next portion of unknown updates, are faced with the fact that the Windows 10 start button does not work.
The menu does not open by clicking on the Start icon and does not respond to the Win key (with a window logo). Sometimes, in addition to this, the "Options" menu may not open and other graphical menus may not function. To fix the problem, read the proposed article to the end and follow the instructions given in it.
Interestingly, in the summer of 2016, Microsoft deigned to release an application to search for and get rid of the factors blocking the appearance of Start.
Restarting the process responsible for the Windows GUI
Explorer.exe is a file that is a graphical shell for Windows. Thanks to him, the explorer, all windows and menus of the operating system work. During its operation, a malfunction may occur (for example, conflicts with RAM addresses). If the start does not work in Windows 10, the first thing to do is to restart the “explorer.exe” process.
1. We call the "Task Manager" using the keyboard shortcut Ctrl + Shift + Esc or the context menu of the taskbar.
2. Go to the "Processes" tab, if the window opened in a different one.
If the dispatcher starts in a simplified window, click on the "Details" button.
3. We find the process "Explorer" or "Explorer" and call the command "Restart".

4. We confirm our intentions to interfere with the functioning of the system process.
The method does not always work, so you should not hope for its viability.
Change the value of one of the registry keys
The next step to take in order to make Start work is to change the value of one of the parameters responsible for the operation of the menu (if there is no key, you will need to create it).
- We call the registry editor integrated into the "top ten" (we execute "regedit" in the search line or command interpreter).
- We go to the section with the parameters of the current user - HKCU.
- Go to Software\Microsoft\Windows\CurrentVersion\Explorer.
- We find the key "EnableXAMLStartMenu" and change its value to "zero". In the absence of a parameter, create a DWORD key with a marked name and value.
- We restart the “explorer.exe” process for the new configuration to take effect.

Other Quick Methods to Get Start to Work
Some users noticed a problem after creating a new account, the path to which contains Cyrillic characters (the username was in Russian). In this case, you need to use the Computer Management tool and change the path to the user directory (rename the folder where the account information is stored).
Also, sometimes the automatic maintenance function of the operating system helps. To activate it, go to the "Properties" of the system, where in the menu located on the left, click on the link "Maintenance and Security", located at the very bottom. Expand the "Maintenance" item and click on the "Start" button. In the near future (the more free resources, the faster) Windows 10 will search for and fix all problems on the computer. This option also helps infrequently, but it is necessary to look for the right solution.
Creating a new account
It happens that the above options do not give the expected results, in particular, renaming the user directory. Try to create a new user whose name should not contain Russian characters.
- We call the window "Run" (press Win + R).
- Type "control" and execute the command.
- After opening the applet, create a new account and log into Windows from under it.
Basically, Start and all other graphical elements work properly. If so, import all settings and transfer files from the old account directory and delete it.
Let's use PowerShell
Finally, there is a less secure way to get Start to function. However, using PowerShell (Advanced Command Prompt) can cause issues with the App Store.
It is recommended that you create a system rollback point before following the steps in this guide.
To run the tool, navigate to the "\System32\WindowsPowerShell\v1.0" directory located in the OS folder and run the powershell.exe file as an administrator.

An equally simple option for calling an extended command line is to run the “powershell” command in a command line launched with administrator privileges.
In the text line of the opened PowerShell window, paste the following command and run it:
Get-appxpackage -all *shellexperience* -packagetype bundle |% (add-appxpackage -register -disabledevelopmentmode ($_.installlocation + “\appxmetadata\appxbundlemanifest.xml”))
The operations will take a few seconds, then check if the Start opens. If it fails again, move on.
Let's use the official utility from Microsoft, called to solve the problem with the Start menu
The tiny program works on the same principle as the troubleshooter, but with respect to graphical elements, in particular Start.
- We go to the Microsoft website and download the application.
- We launch it and click "Next", having familiarized ourselves with the work performed.

Found problems will be automatically corrected, about which the user will be notified in the window with the results of the program. This option can be disabled in advance in order to fix the problem(s) yourself. Also, a message may appear in the final window that the tool did not find any deviations in the system.

To learn more about how the utility works, click the "View More Information" link.

The latest version of the application performs the following checks:
- the presence and normal functioning of ShellExperienceHost and Kartana;
- checks if the given user has the rights to access the registry branch that stores the data necessary for the operation of the Windows 10 graphical shell;
- check the integrity of the database in which the program tiles are stored;
- scans the application manifest for corruption.
Unfortunately, the utility was removed from the official Microsoft website.
Nothing helped
Even in the case when none of the paragraphs of the article helped to return Start, you should not despair. Most users have the checkpointing feature enabled in Windows 10, which makes it possible to roll back the system to an earlier state. These same points are necessarily created before updating the OS, which becomes the main reason for the inoperability of the Start.
In extreme cases, it is not forbidden to reset the "tens" or roll back to its original state.
Among the various innovations first introduced in Windows 10 is one with almost only positive reviews - the Start context menu, which can be called up by right-clicking on the Start button or by pressing the Win + X keyboard shortcut.
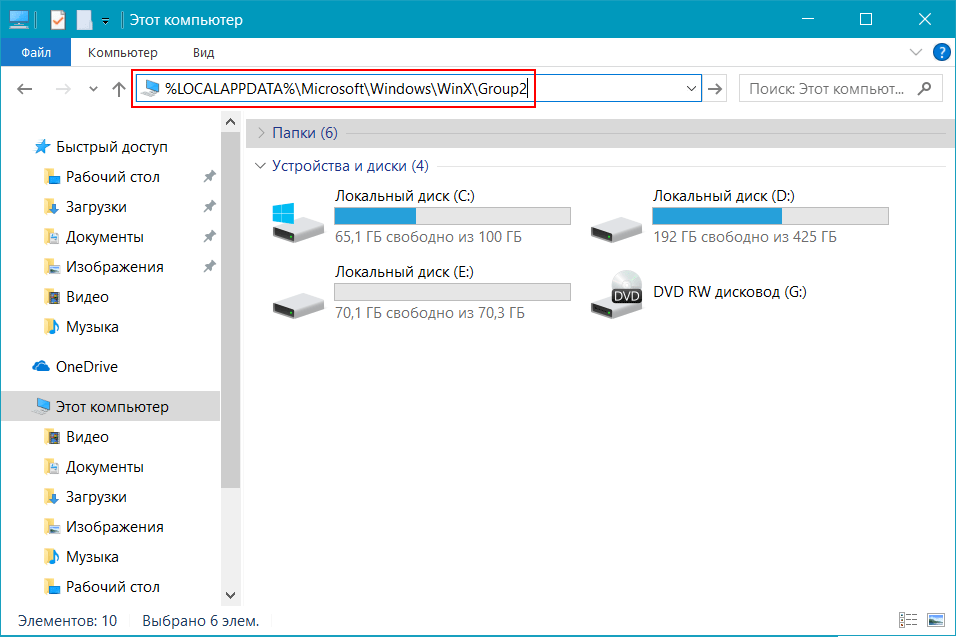
All Win+X menu shortcuts are in the folder %LOCALAPPDATA%\Microsoft\Windows\WinX\(you can paste this path into the "address" field of the explorer and press Enter) or (which is the same) C:\ Users\ username\ AppData\ Local\ Microsoft\ Windows\ WinX.

The labels themselves are located in subfolders corresponding to groups of items in the menu, by default these are 3 groups, with the first one being the bottom one, and the third one being the top one.

Unfortunately, if you manually create shortcuts (in any way the system suggests) and place them in the folders of the start context menu, they will not appear in the menu itself, since only special “trusted shortcuts” are displayed there.
However, it is possible to change your own shortcut as necessary, for this you can use the third-party hashlnk utility. Next, we consider the procedure using the example of adding the "Control Panel" item to the Win + X menu. For other shortcuts, the process will be the same.

Similarly, with hashlnk, you can prepare any other shortcuts to put on the Win+X menu.
This concludes, and if you know additional ways to change the Win + X menu items, I will be glad to see them in the comments.
Classic Shell is a free program to restore the old look of the classic Start menu in Windows 10, Windows 8.1, Windows 8, Windows 7, Windows Vista operating systems. The program changes the visual display of elements of the Windows operating system for more convenient use.
Many users experience inconvenience when using the Start menu due to the fact that the developer of Windows, Microsoft, constantly changes the settings, options, and appearance of the Start menu.
Therefore, many users want to return the classic Start menu for Windows 10, Windows 8.1, Windows 8 operating systems. In the Windows 7 operating system, users change the appearance of the Start menu in the style of the Windows XP operating system.
The free Classic Shell program returns the classic look of the Start menu, allows you to make extensive settings for displaying styles, options and the appearance of the start menu.
The Classic Shell program consists of three components:
- Classic Start Menu - the return of the classic Start menu
- Classic Explorer - Adding a Toolbar to Windows Explorer
- Classic IE - customization of panels in Internet Explorer browser
In this article, we will look at the operation of the Classic Start Menu component, which allows you to make the old Start menu in the Windows operating system. Not all users need other program components.
The Classic Shell program works in Russian. You can download the Classic Shell program from the official website of the developer. On the download page, select the "Classic Shell x.x.x (Russian)" file to download to your computer.
Classic Shell Installation
Installation of the Classic Shell program takes place in Russian and does not cause difficulties. Step through the windows of the Classic Shell installation wizard.
In the "Custom Installation" window, you must select the application components to be installed on your computer. By default, all components are selected for installation.
We want to bring back the classic Start Menu, so we only need to keep the Classic Start Menu and Classic Shell Update components (for automatic updates).
The "Classic Explorer" and "Classic IE" components change the appearance of File Explorer and Internet Explorer, respectively, and not all users need such changes. Therefore, disable the installation of these components.

Classic Shell for Windows 10
After left-clicking on the Start menu, you will see the classic Windows 7 style start menu installed in the Windows 10 operating system. This is what the Start menu looks like with default settings.

The classic Start menu for Windows 8.1 or Windows 8 will look similar.
Customizing the Classic Shell
After installing the application, the "Classic Start Menu Options" window will open. In this window, you can configure all program parameters.
You can change the Classic Shell settings at any time. To do this, right-click on the "Start" menu, and select "Settings" from the context menu.

In the Start Menu Style tab, you can choose a classic style for the Start menu in the style of the Windows XP or Windows 7 operating systems.
At default settings, the standard Start button is displayed on the Desktop. Instead of the button image from the operating system, you can install the image from Classic Shell (two options) or add your own image if you have a similar image.
By default, the main settings in the program are made in the tabs: "Start menu style", "General settings", Cover, "Start menu customization".

Check the box next to "Show all options" to configure other options in the Classic Shell program.
After that, additional settings will become available in the tabs: "Menu appearance", "Start button", "Taskbar", "Windows 10 settings", "Context menu", "Sounds", "Language", "Control", "Main Menu", "General Behavior", "Search Box".

Although the program is optimally configured by default, the user can independently change the application settings to suit his needs by experimenting with the settings. To do this, select the settings, see what happened after changing them. If it turns out that you went too far with the changes in the parameters, you can return the default settings of the program.
In the application settings, you can hide unnecessary features, change the display of items and icons, change the order of items, remove items from the Start menu.
To do this, select an element, select a command and display. After right-clicking on the desired item, select additional functions.
In the Cover tab, you can choose a cover for the standard Start menu. By default, Windows 10 uses the "Metro" skin. You can choose other skins: Windows Aero, Metallic, Midnight or Windows 8, minimalist Classic Skin, or No Skin.

The Classic Shell parameter settings can be saved to an XML file in order to load the settings from this file on a new installation of the Classic Shell program. To do this, use the "Archive parameters" button, select the desired option: "Save to XML file" or "Load from XML file". To reset the program settings to default, select "Reset all settings".
Removing Classic Shell
The Classic Shell program is uninstalled in the standard way. If the program was not removed correctly, or some problems arose during the removal process, use a special utility that can be downloaded from here.
Conclusion
The free Classic Shell program installs an alternative (former classic) Start menu on the Windows operating system. After installing the program on a computer, the user can return the classic look of the Start menu in Windows 10, Windows 8.1, Windows 8, Windows 7, make other changes to the appearance and settings of the start menu.
In Windows 10 Creators Update (version 1703), the Start context menu has undergone minor changes. Engineers “sawed out” the Control Panel item from it and “shoved” the Settings in its place. So now users who have not abandoned the old Control Panel are forced to use workarounds to get into it. This guide describes how to return the Control Panel to the Windows 10 Start context menu in several ways.
How to change Settings to Control Panel in the Start context menu manually
To return Control Panel in the context menu Start (Win + X), you need to borrow the shortcut of this section from the previous version of Windows 10 installed, for example, on your friend's computer.
- On it in the address bar Explorer insert %LocalAppData%\Microsoft\Windows\WinX\Group2 and press Enter to navigate to the specified folder.
- Copy shortcut Control Panel to any USB drive.
 Important: If there are files from a previous version of Windows 10 left on the system partition of your computer, follow the path Windows.old\Users\Account\AppData\Local\Microsoft\Windows\WinX\Group2 and copy the desired shortcut from here.
 - On your computer, follow the path indicated in the first paragraph of this method.

- Move the shortcut from the removable media to the newly opened folder and confirm the replacement. If the system did not offer to replace the shortcut, but simply inserted another object into the directory, go to the external drive window and change the name of the shortcut to 4 - control panel. After that, copy it to the already open folder Group 2. This time, the system should definitely replace the old shortcut with the new one.

- Follow the path C:\ProgramData\Microsoft\Windows\Start Menu\Programs and change the object name Options on the Control Panel. Confirm the change.

- call Task Manager, select the process in its window Conductor and click on the button Restart.

- Click on the keys Windows + X, find the item Control Panel and click on it. The Control Panel should open.

Using Win+X Menu Editor
For users who want to customize the Start context menu, an enthusiastic developer has released the Win + X Menu Editor utility. It provides a simple set of commands and an intuitive interface for editing the Win + X menu. Even though this tool was designed for use on Windows 8, it works great on Windows 10 as well.
You can return the Control Panel to the Start context menu using Win + X Menu Editor as follows:

Now you know how to return the Control Panel to the context menu (Win + X) Start in Windows 10 Creators Update (version 1703).
Starting with Windows 10 v 1803, you can disable context menus for apps and tiles in the Start menu. There is a new Group Policy option that allows you to apply a restriction to the Start menu to prevent users from opening the context menu for Start menu items.
In Windows 10, the start menu is completely different. It has nothing to do with previous implementations. It's a Universal Windows Platform (UWP) app that combines a list of installed apps with live tiles and shortcuts pinned to the right pane.
All items in the start menu have a context menu that allows you to perform various actions such as "Pin to Taskbar", "Pin to Start", "Delete" etc.
Group Policy can be used to disable or enable context menus for apps and tiles in the Start menu. Even if your version of Windows 10 does not have the Group Policy Editor app, this feature can be configured using the registry. In this article, we will look at both methods. We'll start with a way to tweak the registry.
Please make sure you are logged in as an administrator before proceeding.
To disable context menus in the Windows 10 Start Menu, follow these steps.
- Navigate to the following registry key:
If you don't have such a partition, just create it.

- Here, create a new 32-bit DWORD value named DisableContextMenusInStart. Set its value to 1 , this will disable context menus.

Note: Even if you're using 64-bit Windows, you still need to use a 32-bit DWORD value.
- For the changes made using the registry tweak to take effect, you need to restart Windows 10.
Later, you can remove the DisableContextMenusInStart setting to allow users to use context menus on the Start screen in Windows 10.
To save you time, I have made ready to use registry files, the undo file is present. You can download them here:
Disable context menus in the start menu using Group Policy.
If you are running Windows 10 Pro, Enterprise, or Education, you can use the Local Group Policy Editor app to configure the settings mentioned above using the GUI.
- Press Win + R keys on your keyboard and type:
Press Enter .
- Once, the Group Policy Editor will open. Go to section Computer Configuration\Administrative Templates\Start Menu and Taskbar. Enable policy setting - Disable context menus in start menu.


- Restart your computer.
Note: You can only apply the restriction described above to the current user account. In this case, create a parameter DisableContextMenusInStart In chapter: HKEY_CURRENT_USER\SOFTWARE\Policies\Microsoft\Windows\Explorer or configure the policy setting under: User Configuration\Administrative Templates\Start Menu and Taskbar, in the Local Group Policy Editor.
