Disable password prompt on wakeup in Windows. Disable password prompt on wake up in Windows Disable password prompt on wake up windows 10
The instructions describe several ways to remove the password when logging into Windows 10 when the computer is turned on, as well as separately when exiting sleep mode. You can do this not only using the account settings in the control panel, but also using the registry editor, power settings (in order to disable the password prompt when waking up), or free programs to enable automatic login, or you can simply remove the password user - all of these options are detailed below.
In order to follow the steps below and enable automatic login to Windows 10, your account must have administrator rights (usually, this is the default on home computers). At the end of the article there is also a video instruction that clearly shows the first of the methods described. See also:, (if you forgot it).
There is another way to do the above - use the registry editor for this, however, keep in mind that in this case your password will be stored in clear text as one of the Windows registry values, so anyone can view it. Note: a similar method will also be considered below, but with password encryption (using Sysinternals Autologon).
To get started, launch the Windows 10 Registry Editor, to do this, press the Windows + R keys, enter regedit and press Enter.
Go to registry key
HKEY_LOCAL_MACHINE\Software\Microsoft\Windows NT\CurrentVersion\Winlogon

To enable automatic logon for a domain, Microsoft account, or local Windows 10 account, follow these steps:
- Change the value AutoAdminLogon(double click on this value on the right) to 1.
- Change the value DefaultDomainName to the domain name or the name of the local computer (can be viewed in the "This computer" properties). If this value does not exist, it can be created (Right mouse button - Create - String parameter).
- If necessary, change DefaultUserName to another login, or leave the current user.
- Create a string parameter DefaultPassword and enter the account password as the value.
After that, you can close the registry editor and restart the computer - logging in under the selected user should occur without prompting for a login and password.
How to turn off passcode when waking up from sleep
You may also need to remove the Windows 10 password prompt when you wake up your computer or laptop from sleep. To do this, the system provides a separate setting, which is located in (click on the notification icon) All settings - Accounts - Login options. The same option can be changed using the Registry Editor or the Local Group Policy Editor as shown below.
In the “Login required” section (on some computers or laptops, this section may not exist), set “Never” and after that, after waking up, the computer will not ask you for your password again.

There is another way to disable the password request in this scenario - use the "Power Options" item in the Control Panel. To do this, opposite the currently used scheme, click "Setting the power plan", and in the next window - "Change advanced power settings".

In the advanced options window, click on "Change settings that are currently unavailable", and then change the value of "Require password on wakeup" to "No". Apply your settings. Not on all systems in the power settings you will find such an item, if it is missing, skip this step.
How to disable password prompt on wakeup in Registry Editor or Local Group Policy Editor
In addition to the Windows 10 settings, you can disable the password prompt when the system exits sleep or hibernation by changing the appropriate system settings in the registry. This can be done in two ways.
For Windows 10 Pro and Enterprise, the easiest way would be to use the Local Group Policy Editor:

After applying the settings, the password will no longer be requested when exiting sleep mode.
There is no local group policy editor in Windows 10 Home, but you can do the same using the registry editor:

Done, the password will not be asked after Windows 10 wakes up from sleep.
How to enable automatic logon in Windows 10 using Autologon for Windows
Another easy way to disable password entry when logging into Windows 10 and do it automatically is the free Autologon for Windows program, which was previously available on the official Microsoft Sysinternals website, and now only on third-party sites (but it's easy to find a utility on the Internet).
If for some reason the methods described above to disable the password at the entrance did not suit you, you can safely try this option, in any case, there will definitely not be anything malicious in it and most likely it will work. All that is required after starting the program is to agree to the terms of use, and then enter the current login and password (and the domain, if you work in a domain, it is usually not necessary for a home user, the program can automatically substitute the computer name) and click the Enable button.

You will see information that automatic login is enabled, as well as a message that the login data is encrypted in the registry (that is, in fact, this is the second method of this guide, but more secure). Done - the next time you restart or turn on your computer or laptop, you will not need to enter a password.

In the future, if you need to re-enable the Windows 10 password request - run Autologon again and click the "Disable" button to disable automatic login.
How to completely remove a Windows 10 user password (remove password)
If you use a local account on the computer (see), then you can completely remove (delete) the password for your user, then you will not have to enter it, even if you lock the computer with the Win + L keys. To do this, follow these steps.
There are several ways to do this, one of them and probably the easiest is using the command line:

After executing the last command, the password will be removed from the user, and there will be no need to enter it to enter Windows 10.
Video instruction
Additional Information
Judging by the comments, many Windows 10 users are faced with the fact that even after disabling the password request in all ways, it is sometimes requested after the computer or laptop has not been used for a while. And most often the reason for this turned out to be the included splash screen with the “Start at the login screen” option.
To disable this item, press the Win + R keys and type (copy) the following into the Run window:
Control desk.cpl,@screensaver
Press Enter. In the screensaver options window that opens, uncheck "Start at login screen" or disable the screensaver altogether (if the active screensaver is "Blank Screen", then this is also an enabled screensaver, the option to disable looks like "No").

And one more thing: in the latest versions of Windows 10, the Dynamic Lock function appeared, the settings of which are located in Settings - Accounts - Sign-in options.

If enabled, Windows 10 can be password-locked when, for example, you leave your computer with your smartphone paired with it (or turn off Bluetooth on it).
One final caveat: for some users, after using the first method of disabling the login password, two identical users appear on the login screen and require a password. This usually happens when using a Microsoft account, a possible solution is described in the instructions.
Please note that you must use a local Windows account with administrator rights to complete most of the instructions in this article.
How to put a password on a Windows computer
If other people have access to your computer, it is wise to protect Windows with a password. So your settings and data will be safe: without special knowledge, no one can view or change them. Windows will ask you for a password when you turn on your computer, change your account, or wake up from sleep.
- Open "Start" → "Settings" (gear icon) → "Accounts" → "Login Options".
- Click "Add" under "Password".
- Fill in the fields according to the prompts of the system and click "Finish".
How to put a password on Windows 8.1, 8
- In the right sidebar, click Settings (gear icon) → Change PC settings. In the menu of the window that opens, select "Accounts" (or "Users"), and then "Login Options".
- Click on the " " button.
- Fill in the fields, click "Next" and "Finish".
How to put a password on Windows 7, Vista, XP
- Open the "Start" → "Control Panel" → "User Accounts" section.
- Select the desired account and click "Create a password" or immediately click "Create a password for your account".
- Fill in the fields using the system prompts and click on the "Create Password" button.

If outsiders do not have physical access to your computer, it may be better to disable protection. This eliminates the need to enter a password each time the system is started.
- Use the key combination Windows + R and enter in the command line netplwiz(or control userpasswords2 if the first command fails). Press Enter.
- In the window that opens, select the account for which you want to remove the password from the list, and uncheck the box next to "Require username and password". Click OK.
- Enter the password, confirm it and click OK.
Windows will stop asking for a password only when you turn on the computer. But if you lock the screen (Windows key + L), log out, or the computer goes to sleep, the display will still ask for a password.
If the "Require username and password" option is not available, or if you want to completely remove the Windows password instead of disabling it, try another method for more advanced users.
To do this, open the account management section according to one of the instructions at the beginning of this article.
If the open section says you're using an online Microsoft profile (login with email and password), disable it. Then use the system prompts to create a local profile, but do not fill in the password fields during the process.
After you disable your Microsoft account, the system will no longer sync your settings and files across computers. Some applications may refuse to work.
If the local profile is initially active in the account management menu, then simply change the current password, leaving the fields for the new password empty.
When deleting an old password, the system will never ask for it until you add a new one.
How to remove the password when waking up from sleep mode
If you turn off the password prompt at Windows startup, the system may still prompt you for it on wakeup. But you can deactivate this feature separately with these instructions.

- In the search bar in Windows, enter "Power Options" and click on the found link to the section with the same name. Or find it manually through the "Control Panel".
- Click "Require a password on wakeup", then "Change settings that are currently unavailable" and check the box next to "Do not require a password".
- Save your changes.
How to remove the password when waking up Windows XP
- Open the "Control Panel" → "Power Options" section.
- In the window that appears, open the "Advanced" tab and uncheck the box next to "Require a password when exiting standby".
- Save your changes.
If you forgot your password and can't log in to your local Windows administrator profile, you don't have to reinstall the OS at all. There is a simpler way out: resetting password protection. To do this, you will need another computer, a USB drive, and a free password reset utility.
Create a bootable flash drive on another PC

- Download the Lazesoft Recover My Password installer to any available computer.
- Run the downloaded file and install.
- Connect your flash drive to your computer. If necessary, make a copy of the files stored on it, since all information will have to be deleted.
- Open Lazesoft Recover My Password, click Burn Bootable CD/USB Disk Now! and create a bootable flash drive using the program's prompts.
Boot your computer using a flash drive
- Insert the prepared USB drive into the computer whose password you forgot.
- Turn on (or restart) the PC and, as soon as it starts to boot, press the button to go to the BIOS settings. This is usually F2, F8, F9 or F12 - depends on the hardware manufacturer. Most often, the desired key is displayed on the screen during BIOS boot.
- While in the BIOS menu, go to the Boot section if the system did not redirect you there immediately.
- In the Boot section, install the USB flash drive in first place in the list of devices that appears on the screen. If you do not know how to do this, look around - there should be hints about the controls nearby.
- Save your changes.
If the BIOS is also protected by a password that you do not know, then you will not be able to reset Windows password protection using Lazesoft Recover My Password.
Perhaps, instead of the classic BIOS, you will see a more modern graphical interface. In addition, even in various older versions of the BIOS, the settings may differ. But in any case, the procedure will be approximately the same: go to the Boot boot menu, select the desired USB drive as the source and save the changes.
After that, the computer should boot from the flash drive on which the Lazesoft Recover My Password utility is written.
Reset password in Lazesoft Recover My Password
- Select Lazesoft Live CD (EMS Enabled) and press Enter.
- Reset your account password with Lazesoft Recover My Password tips.
- Reload.
After these steps, Windows will stop asking for the old password, and you can set a new one according to the instructions at the beginning of the article.
If Windows is configured to autologin the user at startup, it's especially annoying when it keeps asking for a password when waking up from sleep. Here's how to fix it.In Windows 7 and 8, it is very easy to disable the password. Find the Power Options section in the Control Panel. Tip: To do this, enter the keywords “power” or “wake” (without quotes) in the search bar. In the window that opens, click on the link “Require a password on wakeup” on the left side.


Check the Don't require a password option and click the Save your changes button.

Disable password on Windows 8 tablets
If you have a Windows 8 tablet, open "PC settings" and go to the "Accounts" section.

Select "Sign-in options" on the left side of the screen to access the security settings. You can create a graphical or numeric (PIN) code instead of a regular password, or you can disable the password altogether in the “Password policy” section.

Click the Change button and confirm your action. After that, the system will stop asking for a password on wakeup.
Disable password prompt on wakeup in Windows Vista
Open the Power Options section in the Control Panel, select your current power plan, and click the Change plan settings link, which looks a little different in Vista than in Windows 7/8.


Finally select "No" (No) in the field "Require a password on wakeup" (Require a password on wakeup). Do this for all power plans and click OK.

Disabling the password in Windows XP
In Windows XP, everything is much simpler. Simply open the Power Options section in the Control Panel, go to the Advanced tab, uncheck Prompt for password when computer resumes from standby, and click OK.
Large enterprises care a lot about their safety. Therefore, they are taught to handle pirated copies of Windows correctly. The local admin will not tolerate entering Windows 10 without entering a password, so he teaches everyone to patiently press Win + L. Moreover, he will add to these tricks the requirement to hit the Ctrl + Alt + Del combination so that life does not seem like honey. All this can be set (as an administrator) through netplwiz. But at home, most of the population dreams of how to remove the Windows 10 password and never see it again.
Typically, an administrator password is not set. In XP, this was strict, and it was impossible to enter some commands, but the ten became much softer to look at people. Entering a password is annoying. We have no secrets, and everyone who needs it will steal data through the network. Fortunately, there are many loopholes for this if you know the required HTTP protocol request. Access to all our data is open to hackers, and they constantly demonstrate this, hacking even government sites. And they do it without a password. So why do we need to break our fingers once again when downloading?
Netplwiz
This is one of the most popular tools.
The changes will take effect after a reboot.
Exit from sleep
When waking up, a password entry window appears.

Other users
We just learned how to remove the password from a Windows 10 computer, but not everyone may like the fact that the operational launch brings it directly to the admin. First of all, the admin himself may not like it. How to change it? Log in to the already familiar netplwiz. And select the user on behalf of which the system will log in without requiring a password when logging in. After that, you need to remove the daw indicated on the screen.

It remains to click Apply. The system will require the password of the account on behalf of which it will log in in the future. The changes will take effect after a reboot. Deleting (disabling) password entry is performed from the same snap-in. For all accounts, except for the admin account. This ensures that you automatically sign in to Windows 10 when you need to. To make it easier to enter, enter a hint, this is a mandatory requirement. It will appear and remind you of the necessary information in case of emergency.
Ctrl+Alt+Del
Microsoft believes that a system over the network is harder to hack if you force the user to press Ctrl + Alt + Del each time. Probably, while this window is being loaded, a significant period of time will pass, and the hacker will not have time to go through all the options. This operation can be forced to be performed by everyone from the same master. Let's open the second bookmark.
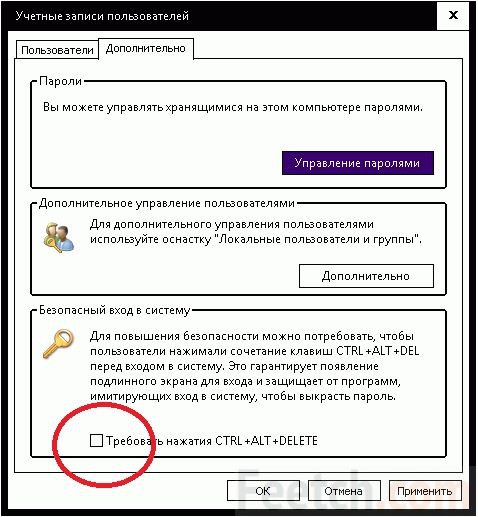
Here is the option we need. Get everyone on their nerves for health.
Advanced
Sometimes you need to solve more complex problems than discussed above. To do this, use the snap-in called from the Control Panel. You can go there in many ways, for example, from the Start menu. Find the System folder and look inside.

Find the Power Options folder in the Hardware and Sound section.

We are interested in the link Setting the transition to sleep mode, click it and select Change advanced power settings. A window will appear with a variety of settings. In particular, allowing you to enable the Hibernation mode, which is not available by default in the tenth version. If the system has a password, then there will also be an option to turn off its request when exiting sleep mode.
